Deep dive into subfinder
A comprehensive guide to using subfinder for subdomain enumeration.
Getting Started with Subfinder
According to Project Discovery,
Subfinder is a subdomain discovery tool that finds and returns valid subdomains for websites. Using passive online sources, it has a simple modular architecture optimized for speed. Subfinder is built for one thing - passive subdomain enumeration, and it does that very well.
If you want to learn more about subfinder from the official documentation, check out the Subfinder Overview.
# Why Subfinder?
Subfinder shines for three core reasons:
- Passive Enumeration: Gathers valid subdomains from public sources (search engines, DNS records, and more) without sending queries directly to the target.
- Speed: Handles thousands of domains in seconds accurately, which makes it perfect for large bug bounty scopes.
- Composability: Designed to be easily integrated into larger workflows, making it a versatile tool for security researchers.
So why is this important? Let's break it down.
# Why is passive enumeration important?
Passive enumeration is important so you can quickly enumerate subdomains without alerting the target. Many targets have rate limits or protections against active scanning, which can lead to IP bans or other issues. By using passive sources, you can gather subdomains without triggering these defenses.
Passive enumeration is not perfect, you will likely miss out on some subdomains that are not indexed by the sources used by Subfinder. However, if you combine passive and active enumeration, you can run your scans on the subdomains found so far, and combine subdomains with newly found ones when you run active enumerations (such as brute-forcing subdomains).
# Why is speed important?
Speed is important so you can quickly move through your reconnaissance phase and identify potential attack vectors without wasting time. Therefore, you can kick off scans on the discovered subdomains immediately, allowing for a more efficient workflow. Then, you can combine active enumeration which is slower and executed more rarely. However, while the slower scan is being done, you can start diving deeper into specific parts of the app.
# Why is composability important?
Composability is important because it allows you to integrate Subfinder into your existing workflows and tools. You can easily transform the data to fit your needs, whether that's feeding it into another tool, visualizing it, or incorporating it into a report.
With all this out of the way, let's get started with Subfinder.
# Installation & Setup
# Install with Go
I would strongly advise installing the subfinder using Go:
However, you can always visit the official docs if you prefer other installation methods.
It would be best if your machine is already set-up in a way that the subfinder
is already exposed in your PATH. However, you can just as easily install it in
your workflow by creating a step:
# Configure Subfinder
For most users, the default configuration works well. However, to unlock the full potential of Subfinder, consider configuring API keys for various data sources.
To view all available sources, run:
For the detailed configuration instructions, you can refer to the Post install configuration guide.
# Diving deeper into subfinder
Let's see all the options available for subfinder at the time of writing this post.
You can run subfinder -h to see all the options. Let's break down every
section one by one, instead of going through every option.
# Input
Subfinder supports 2 input methods:
# -d, -domain string[]
Specifies one or more domains to find subdomains for. You can provide multiple domains by separating them with commas.
This input type is especially useful when you are targetting a single domain, or a small number of them.
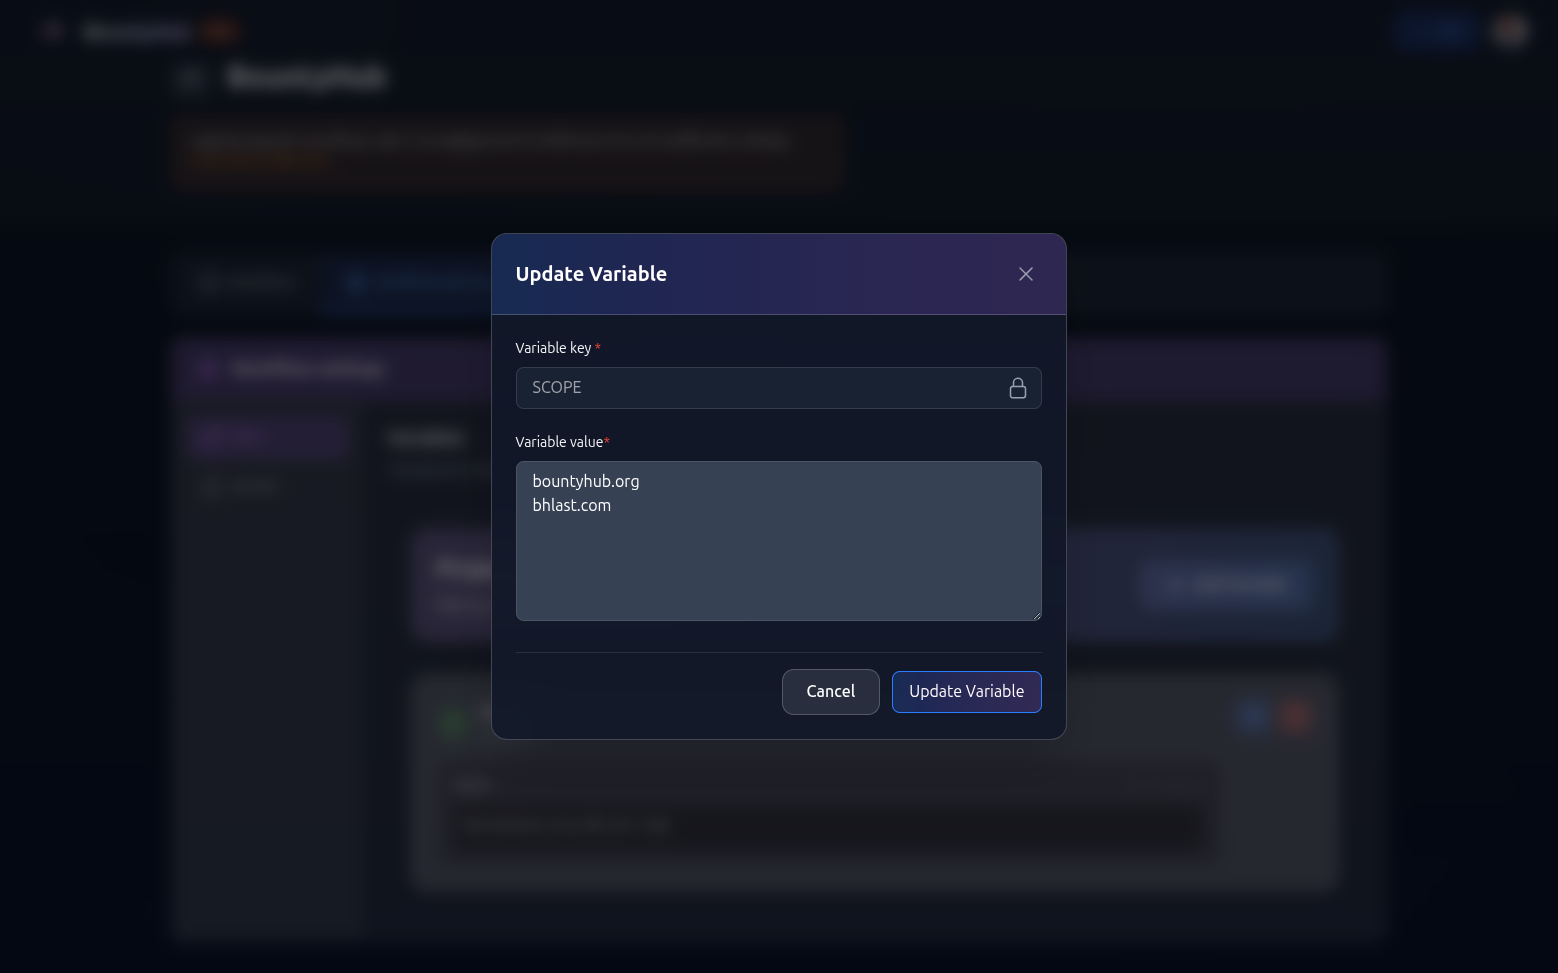
However, what you should likely do is use project variables in your workflow,
and maintaining a comma-separated values is not ideal way to do so. But if you
want to do it, you can create a variable named SCOPE with value:
Then, you can use it in your workflow like this:
# -dL, -list string
Specifies a file containing a list of domains for subdomain discovery. Each domain should be on a new line.
This is by far the best way I found to manage large scopes. You can maintain a single file with all your target domains,
You should likely specify a project variable so it can be nice and reusable.
Then, you can use it in your workflow like this:
# Source
The source section allows you to specify which sources to use for subdomain discovery.
As it is mentioned, the subfinder is mostly passive reconnaissance tool, so it relies on public sources to gather subdomains.
Some sources require API keys. More about it in the configuration section.
Let's go through every option and see how to use them
# -s, -sources string[]
This option allows you to specify which sources to use for discovery. You can provide multiple sources by separating them with commas.
For example, to use only crtsh and github as sources, run:
I tend to not directly use this option especially in automation, but if you found that some sources are more reliable than the others for a specific program, you might want to consider specifying it explicitly.
You can visit the list of all sources by running subfinder -ls
# -recursive
This option allows you to only use sources that can handle subdomains recursively rather than both recursive and non-recursive sources. I haven't found a use-case for this option yet, but it might be useful in some scenarios.
# -all
This option allows you to use all sources for enumeration. This can be slow, but it ensures that you are using every possible source to find subdomains.
I prefer using this option especially because automation is running in the background, scheduled during the time I won't be hacking anyway.
Since subfinder is already quick enough, it is worth more to have more complete information, than to have a quick result.
# -es, -exclude-sources string[]
This option allows you to exclude specific sources from enumeration. You can provide multiple sources by separating them with commas.
Use this option when you want to avoid sources that are unreliable or not relevant to your target.
# Filter
This section allows you to filter the results based on specific criteria.
This section is very useful when dealing with companies that tend to have many
subdomains found, but not all of them are valid. Netflix is a great example of
such company. There were many subdomains in form of ipv4-.... These subdomains
are not interesting for bug bounty hunters, so we can filter them out.
Another useful use-case is when the program explicitly excludes certain subdomains. You can filter those out.
# -m, -match string[]
This option allows you to specify subdomains or a list of subdomains to match. Only the subdomains that match the specified criteria will be included in the results.
This type oof match is a positive condition, so only the subdomains that match the criteria will be included.
The match is a regexp. Therefore, you can include wildcards. For example, to
match all subdomains containing the .api. string, run:
# -f, -filter string[]
This option allows you to specify subdomains or a list of subdomains to filter out. The subdomains that match the specified criteria will be excluded from the results.
Filter is the oposite of match. Its condition is negative. This means that everything that matches the regexp will be excluded.
For example, to filter out all subdomains containing the .ipv4- string, run:
You can also combine project vars if you want to maintain a list of subdomains to filter out.
# Rate Limit
Subfinder has a rate limit for some of its sources. If you hit the rate limit, you will see an error message indicating that you have exceeded the allowed number of requests.
This is especially important when you want to run parallel scans. So, let's say you schedule multiple projects with the subfinder scan running at the same time. Let's also say that you have multiple runners on the same machine (or parallel execution of the runner allowing you to run multiple scans simultaneously by the same runner)
The problem you might bump into is that you might get rate-limited on a particular source.
Therefore, you might want to relax the default rate-limits, allowing particular scan to run a bit slower, but preserving the ability to run multiple scans in parallel.
It is important to mention that the back-offs are handled by default by subfinder, but it is better to not get into that situation so you don't get blocked.
# -rl, -rate-limit int
This option allows you to set a global maximum number of HTTP requests to send per second. This is useful for controlling the overall rate of requests made by Subfinder.
To better understand this, subfinder won't send more than specified number of requests, regardless of the source.
# -rls, -rate-limits value
This option allows you to set maximum number of HTTP requests to send per second for specific providers in key=value format.
It is easier to set the global rate limit using the -rl flag, but you
understand your workflows the best, so having such control to limit-per-source
is very useful.
# -t int
This option allows you to set the number of concurrent goroutines for resolving subdomains. This is only applicable when using active enumeration.
Use this with caution. If you increase the number of goroutines too much, you might end up overwhelming the target.
Let's quickly explain the concept of a goroutine. Goroutine is basically a lightweight thread. A thread is a sequence of instructions that can be executed independently. Knowing this, if your machine has more than 1 CPU core, you can run multiple threads at the same time (parallelism).
Goroutine is an abstraction over threads, allowing go runtime to swap goroutines on the same thread, making them more lightweight. Therefore, if the thread blocks with the goroutine, the runtime can provision a new thread, and you have another parallel execution while waiting for the result.
Why is this important? It all comes back to the rules of engagement. If your target explicitly allows certain amount of requests per second, you can adjust this value to better fit your needs.
# Update
Update section allows you to quickly update the binary and fetch the latest version.
# -up, -update
This option allows you to update Subfinder to the latest version. It is a good practice to keep your tools up-to-date to benefit from the latest features and bug fixes.
You can have a scheduled workflow that runs periodically to update the subfinder binary.
# -duc, -disable-update-check
This option allows you to disable the automatic update check for Subfinder.
Checking for updates is quite quick, but if you want, you can add this line so that subfinder starts executing right away.
# Output
One of the best things about tools from Project Discovery is the output section. Subfinder is no exception.
# -o, -output string
This option allows you to specify a file to write the output to. The output will contain the discovered subdomains.
This option I use in all my workflows.
# -oJ, -json
This option allows you to write the output in JSONL(ines) format.
To better understand what is jsonl, think of it as a file where each line is a valid JSON object.
I also use this option always.
# -oD, -output-dir string
This option allows you to specify a directory to write the output when using the
-dL option. Each domain's results will be written to a separate file in the
specified directory. I haven't found a use-case for this option yet, but it
might be useful when testing multiple domains and you want to keep the results
separate.
# -cs, -collect-sources
This option allows you to include all sources in the output when using the -oJ
option. This is particularly useful for debugging and understanding where each
subdomain was discovered from.
I tend to not use this option, but if you want to make sure everything is included so you can later filter out the sources giving you incorrect informatin, use this option and see if a particular source is giving you bad data.
# -oI, -ip
This option allows you to include the host IP in the output when using active enumeration. This is useful for understanding the IP addresses associated with the discovered subdomains.
Since I usually use httpx as the next step after subfinder, I tend to not use
this option. I do, however, use the -active flag sometimes, when I want to
make sure that only active subdomains are included in the output.
# Configuration
Configuration is one of the things that might give you an edge over other bug hunters.
If you have API keys for various sources providing more reliable information, you can configure them in the config file.
Let's first understand the two config files used by subfinder.
# config.yaml
The config.yaml file is the main configuration file for Subfinder.
Using this file, you can specify default flags used by your subfinder instance, so you don't have to manually specify them.
For example, if you want to always include the -all flag, you can specify it
in the config.
Now, every time you run subfinder, it will include the -all flag by default.
# provider-config.yaml
The provider-config.yaml file is used to configure provider-specific
parameters.
The official documentation provides an example provider config. For each provider, you can specify the API key and other parameters.
At the time of writing, every configuration parameter is a list of strings, where these strings are API keys.
I'm personally not a huge fan of this approach, but it works.
Now, let's start talking about the flags.
# -config string
This option allows you to specify a custom config file for Subfinder. By
default, it looks for the config file at ~/.config/subfinder/config.yaml.
The subfinder will generate the commented out file for you if it is not present. Commented out file means that all flags are using their default values (if the default value is specified by the flag).
The config file you are specifying with this flag is config.yaml.
# -pc, -provider-config string
This option allows you to specify a custom provider config file for Subfinder.
By default, it looks for the provider config file at
~/.config/subfinder/provider-config.yaml.
The subfinder will generate the commented the file with all providers containing
empty arrays (no API keys). If you have API keys for a provider, make sure you
modify this file, or provide a file with the pc flag.
The file you are specifying with this flag is provider-config.yaml.
# -r string[]
This option allows you to specify a list of resolvers to use for DNS resolution. You can see the default list of resolvers here.
# -rL, -rlist string
This option allows you to specify a file containing a list of resolvers to use for DNS resolution. Each resolver should be on a new line.
It works similarly to -dL flag. You can specify a project variable containing
your custom resolvers, and use those. But in most cases, the default resolvers
work just fine.
Use this only if you get blocked by a specific resolver.
# -nW, -active
This option allows you to display only active subdomains. When you specify the
-active flag, you basically tell the subfinder to remove all findings with
wildcards, and that have IP that DNS resolvers cannot resolve.
In other words, let's say that you found test.example.com, but when you try to
resolve it, there is no IP associated with it. The subfinder will remove it from
the final output.
My advise is to use this flag only when you are very familiar with the target.
You can always filter out the wildcard domains by hand, but if some records are found, not having the IP, it might be a mistake in the source finding that subdomain, or it might be a domain that used to be there, but no longer is.
If it is the case that the domain used to be there, knowing the naming used for that domain can help you in the active stage when you try to brute-force the subdomains that are not found using passive sources.
Again, use this at your own discression. What I tend to do is include
everything. The httpx will resolve or not resolve that subdomain. I get
notified anyway. So I can compare the results, see if the subdomain used to be
there, and see if I can deduce the naming convention.
# -proxy string
This option allows you to specify an HTTP proxy to use with Subfinder. This is useful if you want to route your requests through a proxy server for anonymity or to bypass network restrictions.
# -ei, -exclude-ip
This option allows you to exclude IPs from the list of domains. This is useful if you want to focus only on domain names and ignore any IP addresses that may be associated with them.
# Debug
The debug section allows you to enable debug mode for Subfinder. This is useful for troubleshooting and understanding the internal workings of the tool.
It is, however, not something that you should use in your normal workflows,
except for maybe -silent flag.
# -silent
This option allows you to show only the discovered subdomains in the output. All other information, such as progress and status messages, will be suppressed. It tends to be useful to reduce the output log, but I prefer to keep it to know if the tool is outdated. I always output to a file, not to the stdout, so having a banner printed doesn't bother me :).
# -version
This option prints the version of the subfinder. It is not important for your automation.
# -v
Show the verbose output. This flag is rarely important for automation. You
specify what the tool needs to output, specify the -json, and you are good to
go.
If you want to debug command locally, then you might want to run in verbose mode.
# -nc, -no-color
This option allows you to disable color in the output. This is useful if your terminal does not support color or if you prefer a plain text output.
If you are outputting to a file, colors might mess up the output, so consider using this flag in such cases.
# -ls, -list-sources
This option allows you to list all available sources for subdomain discovery. This is useful for understanding which sources are being used by Subfinder.
The ones that are marked with * next to their names, are the ones that will be
used when you run it.
# -stats
This option allows you to report source statistics. This is useful for understanding the performance and effectiveness of each source used by Subfinder.
Rarely useful in automation, but might be interesting to know.
# Optimization
This section allows you to optimize the performance of Subfinder. You know your target the best, so you can adjust these settings to better fit your needs.
# -timeout int
This option allows you to set the timeout duration in seconds for each request made by Subfinder. If a request takes longer than the specified timeout, it will be aborted.
The 30s is a good default value. If you are targetting a very slow target, consider increasing it. However, if you increase it too much, you might end up waiting too long for requests that are not going to succeed anyway.
Important thing to mention is that if you are using proxy, the requests might take longer.
# -max-time int
This option allows you to set the maximum time duration in minutes for the entire enumeration process. If the enumeration takes longer than the specified maximum time, it will be aborted.
The 10m is a good default value. If you are targetting a very large scope, consider increasing it. However, if you increase it too much, you might end up waiting too long for results that are not going to come in anyway.
# BountyHub Integration
Now, we get to the fun parts. You run the subfinder from your own machine, and you want to automate it.
I hate blog posts or tutorials that concentrate on the easy use-case. We can all figure that stuff out.
Therefore, let's not do that, but instead, create a workflow that will:
- Keep subfinder configuration in the blob storage. This way, we can update the subfinder config at one place, which will be reflected on all workflows on all machines where your runners are.
- Use vars to specify the scope. We can build a workflow template, which we will re-use across projects. The best way to do so is using variables wherever we can.
- Generate PAT so your workflow can pull the files from the blog storage.
- Notify us when there is a diff in the output.
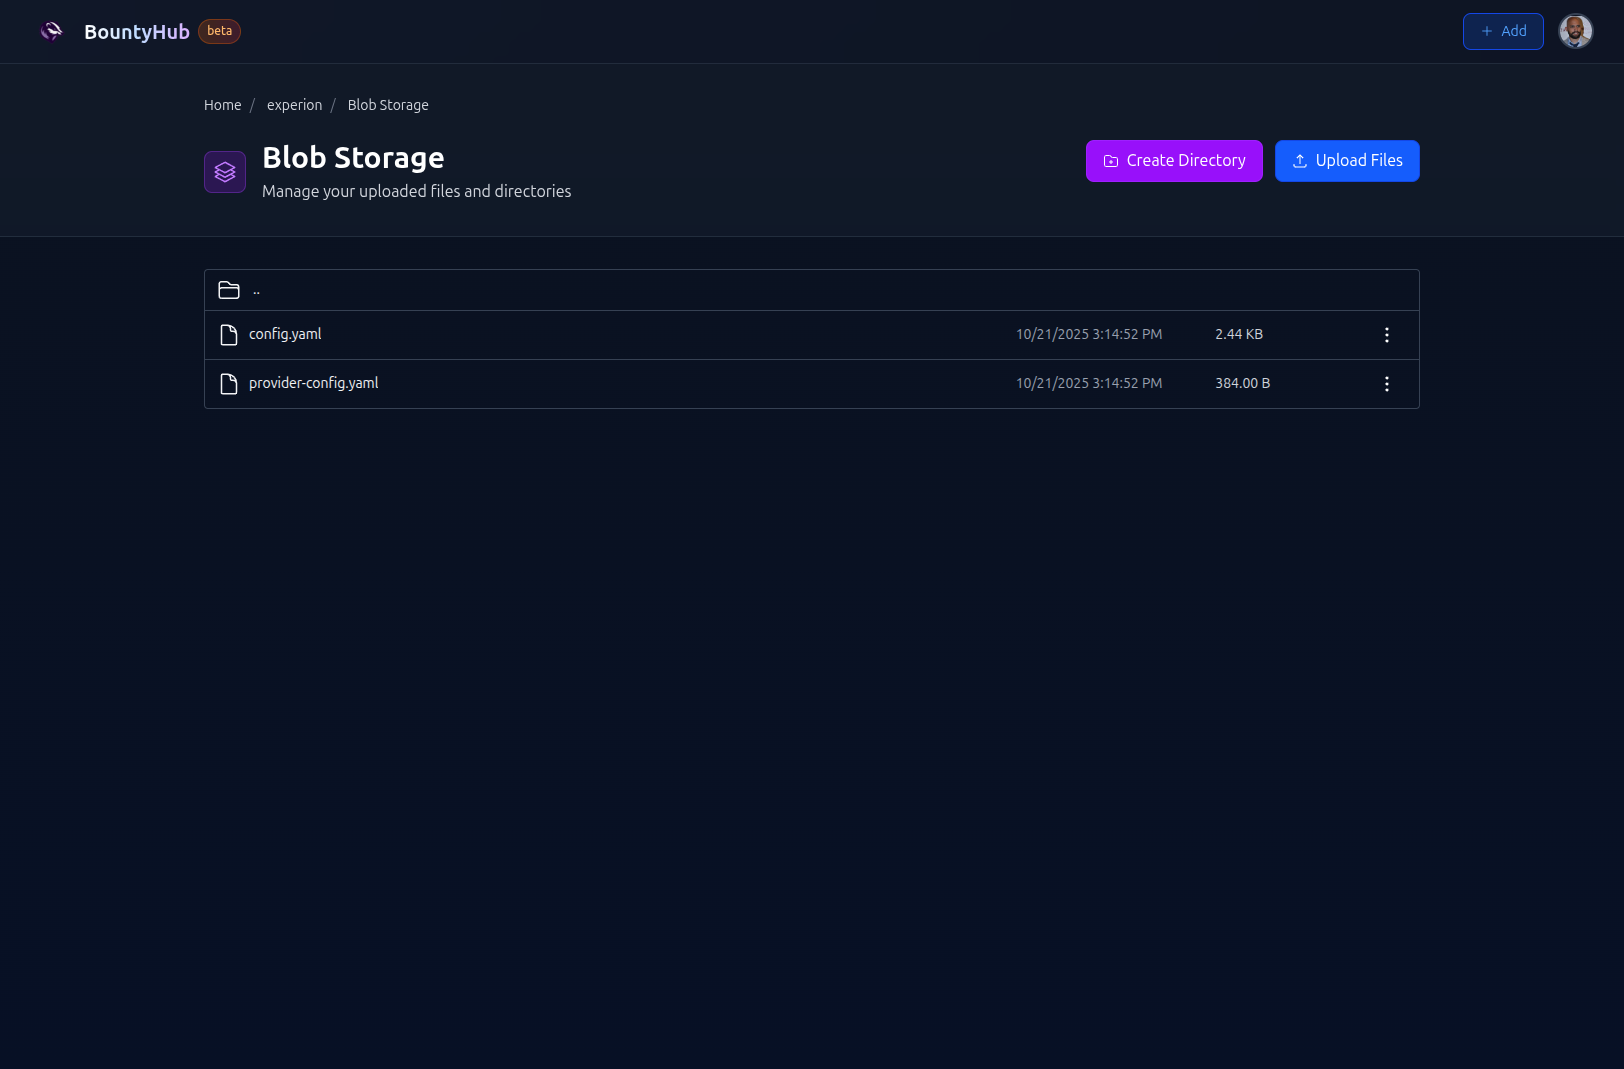
# Step 1: Upload config files
Use the config from the blog storage. This can be done by visiting
Blob Storage You can make
directory based on your linkings, I used subfinder directory. You can click on
Create Directory button, name the directory subfinder, step into it, and
upload files.
Here is how it looks like:
# Step 2: Use vars to specify the scope
As described above, you can simply use project vars in the Workflow settings tab.
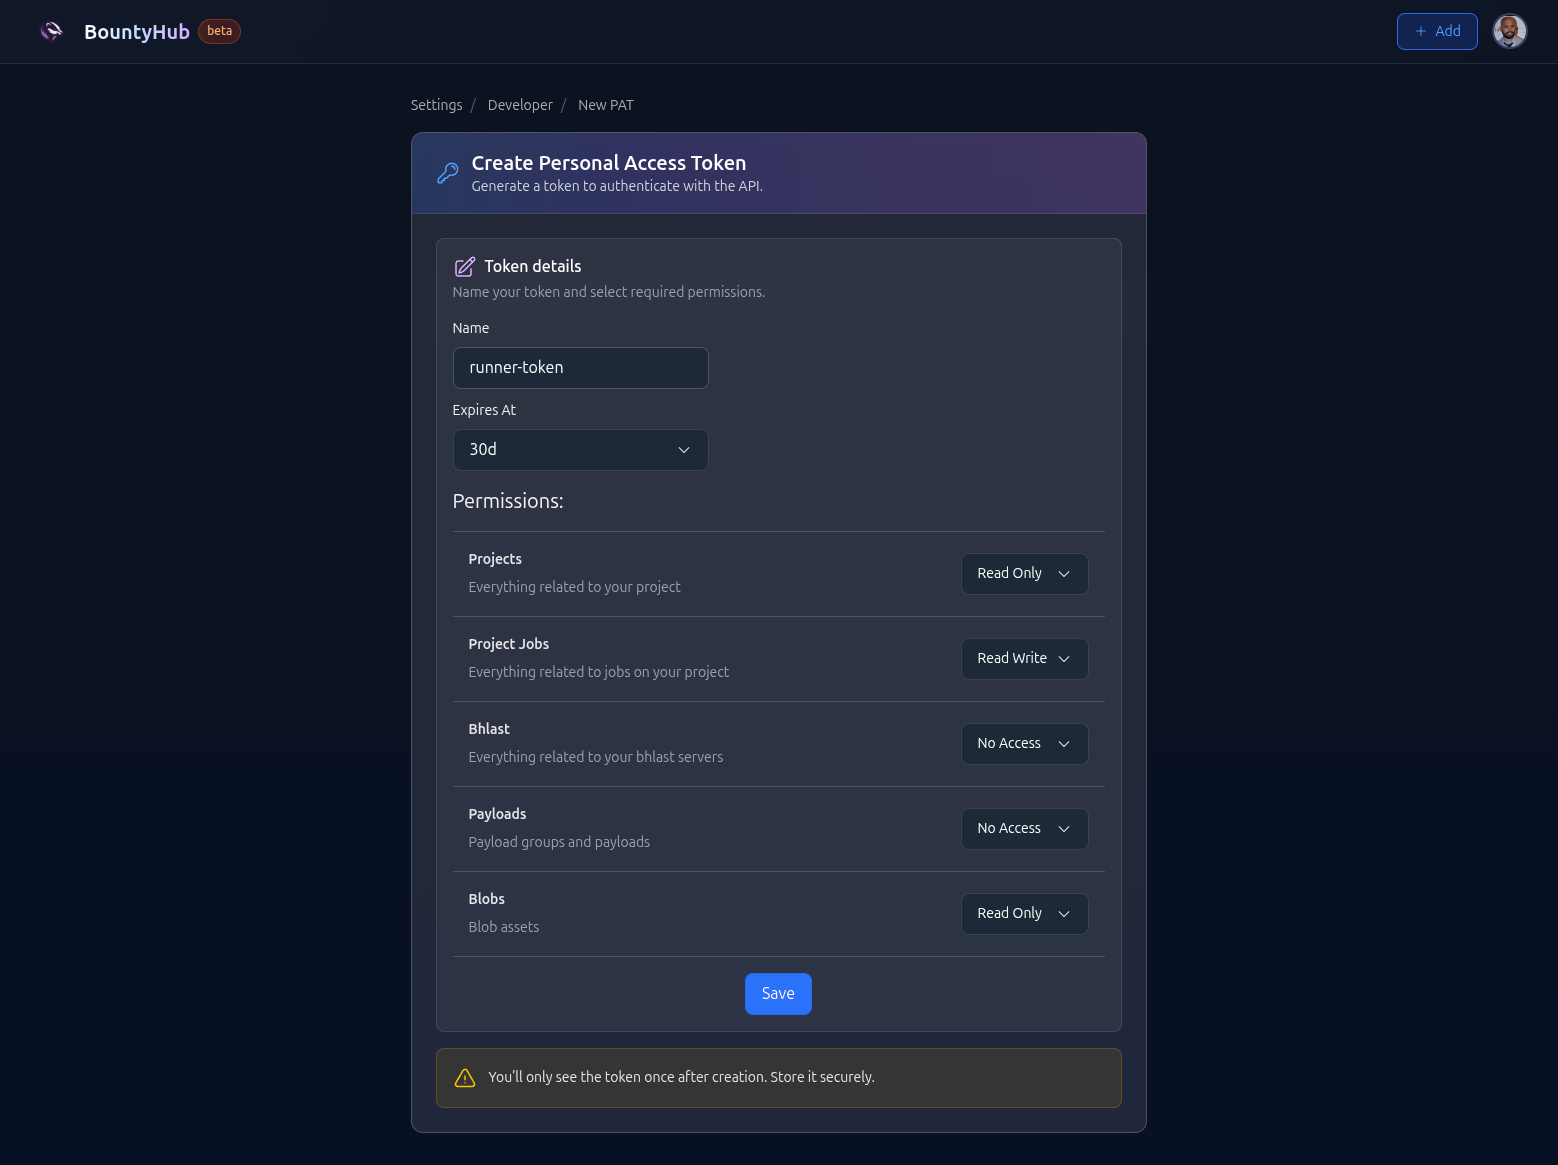
# Step 3: Create PAT and store it in project secrets
In order to be able to pull anything from your assets, you must be authorized. One way to do so, is to use PAT.
In order to generate PAT, you can visit Developer Settings, and create PAT assigning permissions you need. In this example, we will use:
- project_jobs:rw - I want to be able to read and write jobs in case I want to dispatch job in my workflow.
- project:ro - Project read-only is automatically selected when project_jobs is read-write.
- blobs:ro - Ability to read blobs
It looks something like this:
Please do not forget to visit Workflow settings, specify BOUNTYHUB_TOKEN
secret, and paste the output of your newly create token.
# Step 4: Write the workflow scan
# Conclusion
The subfinder is a very powerful tool, well designed by security professionals! I am a huge fan of the work that ProjectDiscovery is doing!
The fact that the tool is fast and reliable makes it a great choice for bug bounty hunters and security researchers.
The composability of the tool allows you to easily integrate it into your existing workflows and tools, making it one of the most versatile tools out there.
# Last words
If you have any suggestions about the things to cover on this blog, please do not hesitate to reach out!
All contacts are available on the Support page, but I would advise you raising it on Discord.
Currently Reading
Deep dive into subfinder